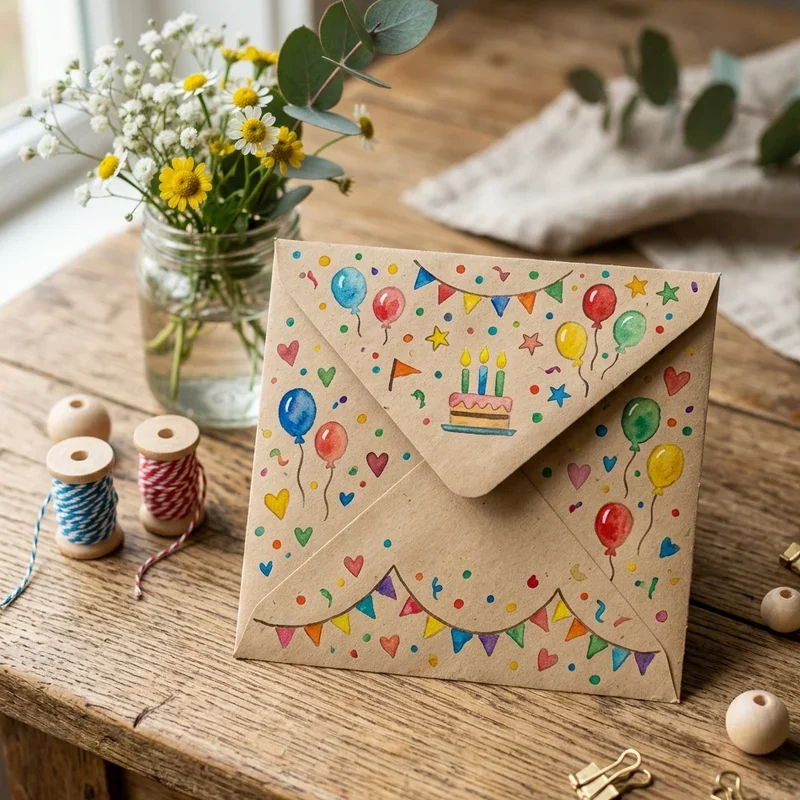
15 DIY Birthday Card Ideas That Feel Special and Unique
Discover 15 creative DIY birthday card ideas that feel special and unique. Easy handmade cards perfect for anyone you love.
There is something magical about receiving a handmade birthday card that no store-bought greeting can ever replicate. When you take the time to create something with your own hands, you pour a piece of yourself into every fold, every brushstroke, and every carefully chosen word. Think about it like cooking a homemade meal versus ordering takeout. Both fill the stomach, but only one feeds the soul. In a world dominated by digital messages and quick texts, a handcrafted card stands out like a lighthouse in the fog. Whether you consider yourself an artistic genius or someone who struggles to draw stick figures, these DIY birthday card ideas will help you create something truly memorable. Let us dive into fifteen wonderful ways to say happy birthday that will make your loved ones feel genuinely cherished.
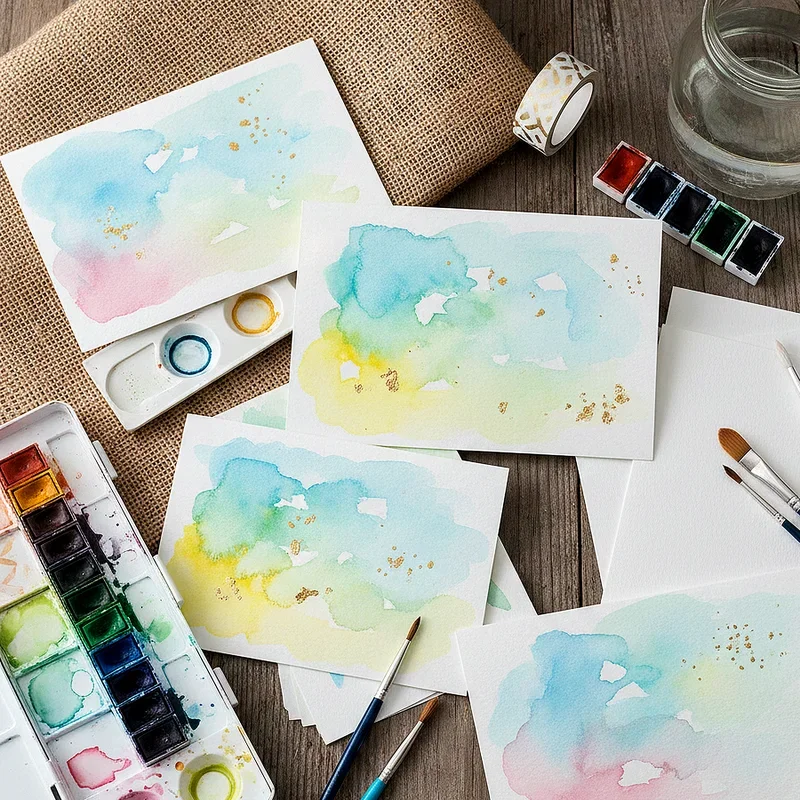
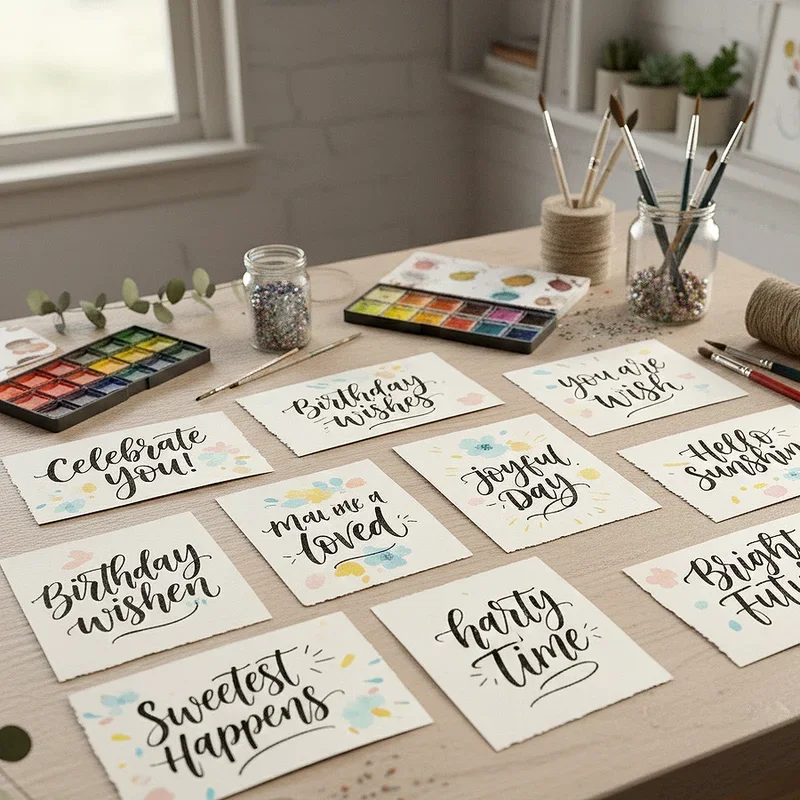
1. Watercolor Wash Birthday Cards
Imagine the gentle blend of sunrise colors spreading across a morning sky, and you have captured the essence of watercolor wash cards. This technique works beautifully for beginners because imperfection actually adds to the charm. Simply wet your cardstock with clean water, then drop in watercolor paints and watch them dance and blend together organically. You can create stunning gradient backgrounds in minutes without any formal art training whatsoever. Once your wash dries completely, add your birthday message with a fine tip marker or metallic pen for contrast. The soft, dreamy backdrop makes any sentiment feel poetic and thoughtful. These cards look incredibly professional despite requiring minimal skill, making them perfect for nervous first-time crafters wanting impressive results.
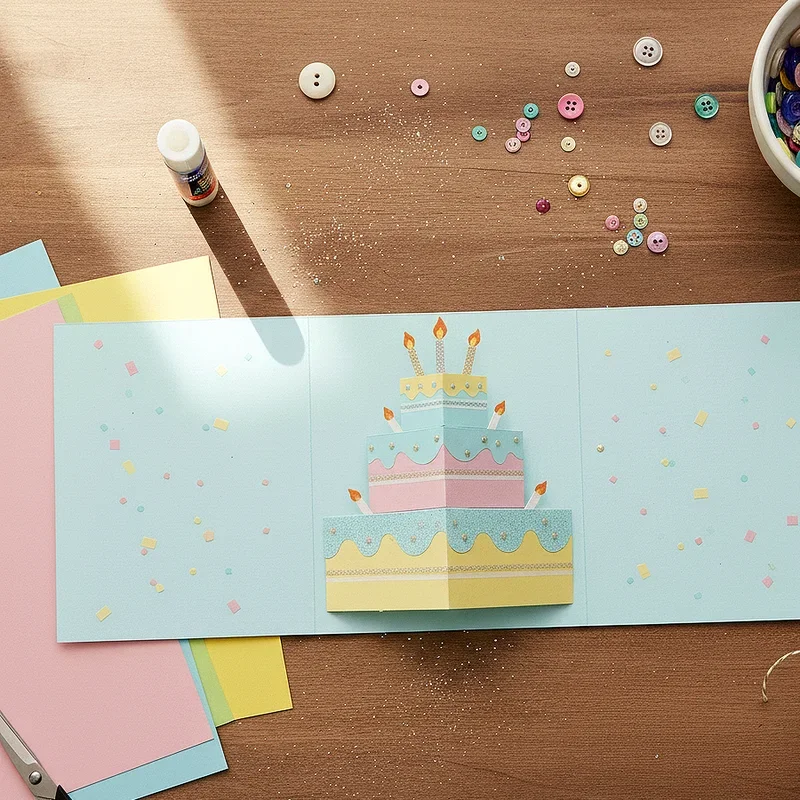
2. Pop Up Cake Surprise Cards
Nothing captures the excitement of birthdays quite like a three-dimensional cake springing to life when someone opens your card. Pop up mechanisms might seem intimidating at first glance, but they actually rely on simple folding techniques that anyone can master. Start with a basic accordion fold or parallel cut method to create the structural foundation for your design. Layer colorful paper to build cake tiers, adding details like candles, frosting swirls, and sprinkles using smaller paper pieces. The moment of revelation when the recipient opens the card creates genuine delight that flat designs simply cannot achieve. This interactive element transforms your greeting from something passive into an experience worth remembering. Your recipient will likely keep this card displayed for weeks.
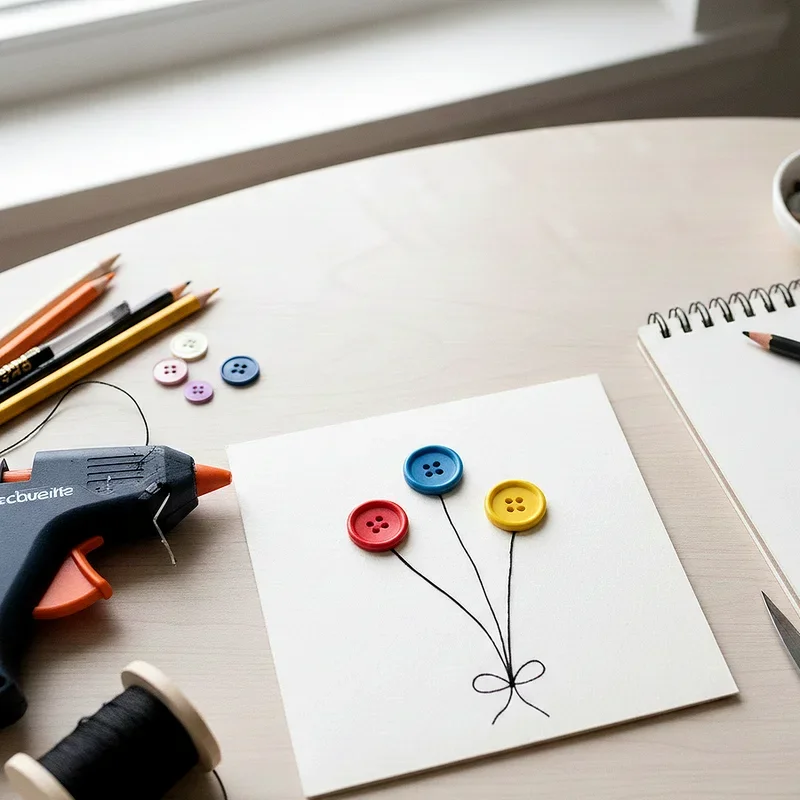
3. Button Balloon Birthday Cards
Raid your spare button collection because these cheerful cards transform ordinary notions into floating works of art. Arrange colorful buttons across your cardstock to create clusters of birthday balloons rising toward the sky. Draw or stamp thin strings trailing down from each button, tying them together at the bottom in a decorative bow. The dimensional quality of actual buttons adds tactile interest that printed images cannot replicate. Mix various sizes, colors, and styles of buttons to create visual depth and personality in your design. This technique works especially well for children's birthday cards, though adults appreciate the nostalgic whimsy just as much. The cards feel substantial and gift-like in the recipient's hands.
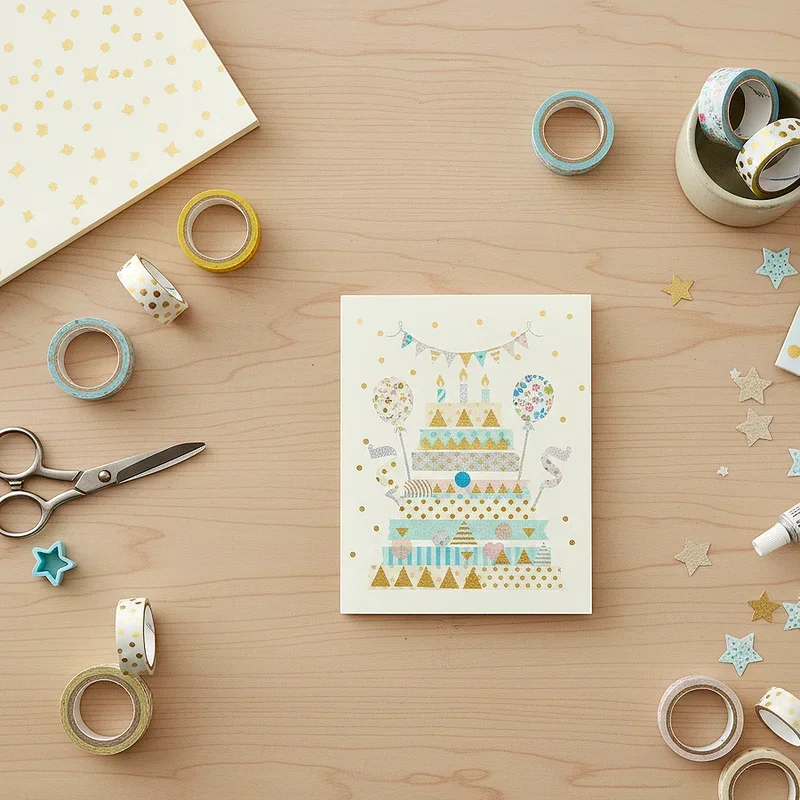
4. Washi Tape Masterpiece Cards
Washi tape has become the crafter's best friend for good reason, as these decorative Japanese tapes offer endless creative possibilities. Create geometric patterns, stripes, borders, or even representational images using various tape widths and designs. Layer different patterns together to build visual interest without any drawing skills required. Make birthday candles using tape strips with tiny flame shapes cut from gold or orange paper. Design a birthday cake entirely from horizontal tape layers, or create abstract modern art patterns that feel gallery-worthy. The removable nature of washi tape allows you to experiment and adjust your design until perfection emerges. These cards appeal particularly to recipients who appreciate clean, contemporary aesthetics.
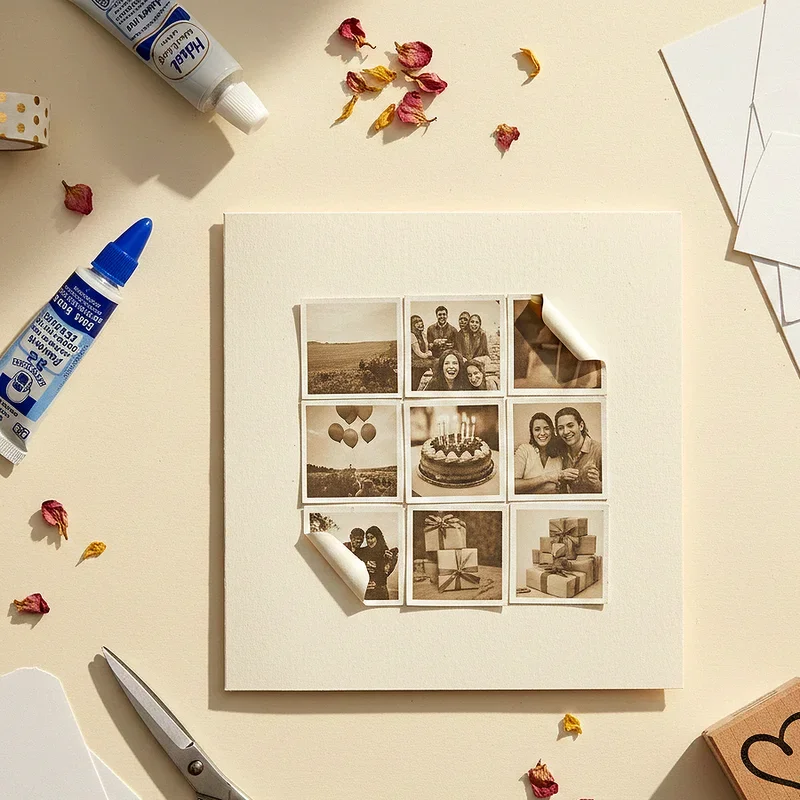
5. Photo Memory Collage Cards
Transform your birthday card into a nostalgic journey by incorporating actual photographs of shared memories and experiences. Print small photos from your phone showcasing special moments you have shared with the birthday person throughout the years. Arrange them collage-style across your card, overlapping edges and varying sizes for dynamic visual flow. Add handwritten captions, dates, or inside jokes beneath each image to personalize the experience further. This approach works magnificently for milestone birthdays when reflection on the passing years feels particularly meaningful and appropriate. The recipient receives not just a card but a tangible reminder of your relationship and the memories you have built together. These become keepsakes rather than recyclables.
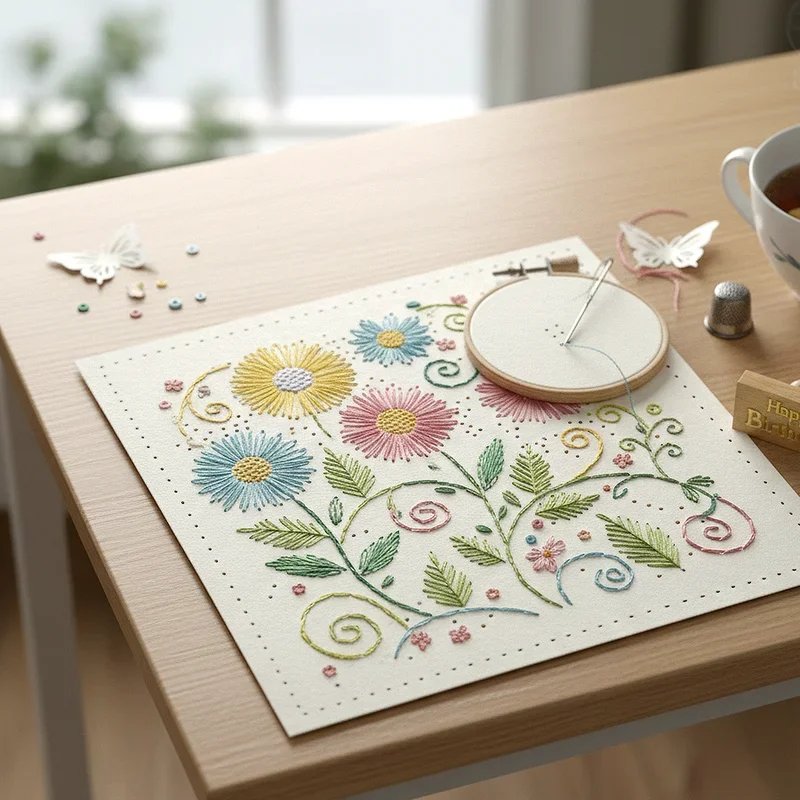
6. Embroidered Paper Cards
Combine the unexpected textures of needlework with traditional card making for results that feel truly extraordinary and unique. Use a needle to punch evenly spaced holes in your cardstock, then weave colorful embroidery thread through the openings in decorative patterns. Create simple shapes like hearts, stars, or flowers, or attempt more complex designs as your confidence grows. The raised texture of thread against smooth paper creates sensory contrast that recipients find irresistible to touch. This technique requires patience but no specialized skills beyond basic hand sewing that most people already possess. The finished cards feel expensive and boutique-quality despite costing mere pennies in materials. Recipients often frame these rather than filing them away.
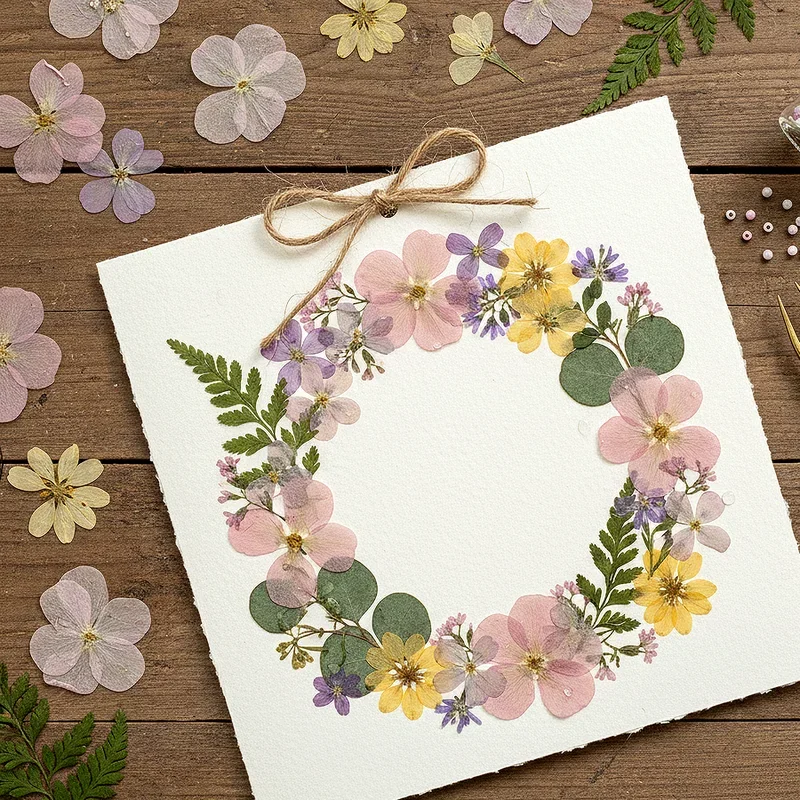
7. Pressed Flower Botanical Cards
Bring the garden indoors by incorporating real pressed flowers and leaves into your birthday card designs. Pressing flowers takes advance planning since they need several weeks between heavy books to flatten and dry properly. Once prepared, arrange your botanical specimens on cardstock using tiny dots of adhesive, creating wreaths, borders, or scattered garden effects. Cover your arrangement with a layer of clear contact paper or brush with matte medium to protect the delicate petals. These cards feel like receiving a piece of nature itself, connecting the recipient to the beauty of the outdoors. They work particularly well for nature lovers, gardeners, or anyone who appreciates organic, earthy aesthetics in their decor.
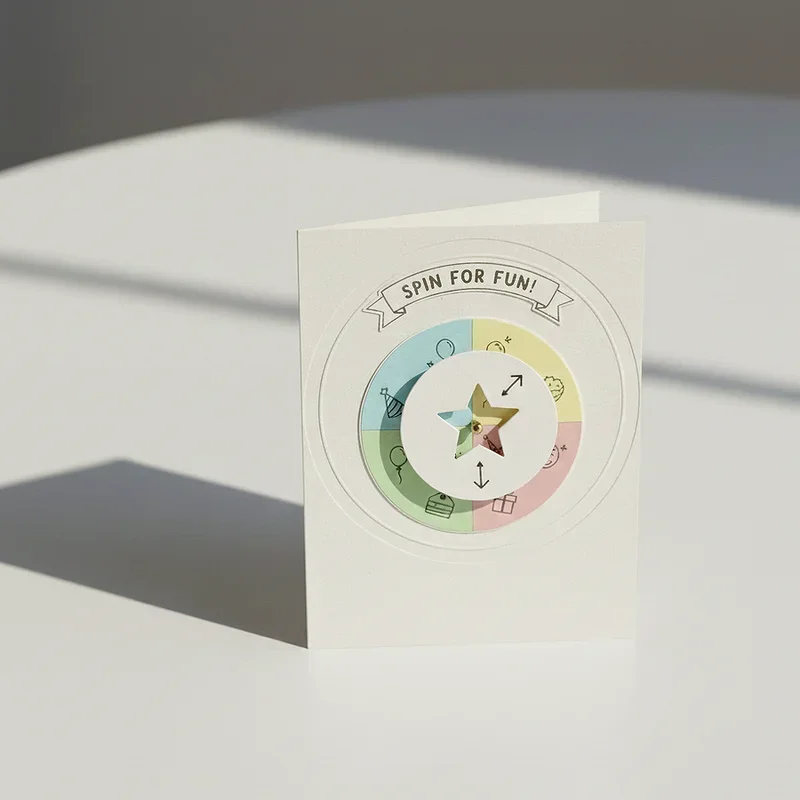
8. Interactive Spinner Cards
Add an element of surprise and play by incorporating a spinning mechanism that reveals different messages or images when rotated. These cards use a simple brad fastener through layered circles of cardstock, with windows cut to reveal portions beneath. As the top layer spins, different greetings, wishes, or illustrations appear through the window, creating an engaging interactive experience. Include messages like various birthday wishes, memories, or reasons why you appreciate the recipient on each reveal. The playful nature of spinner cards appeals to all ages and adds entertainment value beyond traditional static designs. Recipients find themselves spinning repeatedly, discovering each hidden message with childlike curiosity and delight.
9. Origami Accent Cards
The ancient Japanese art of paper folding adds dimension and elegance when incorporated into birthday card designs. Fold small origami shapes like hearts, butterflies, flowers, or stars to attach to your card as three-dimensional embellishments. Even simple folds create sophisticated results that impress recipients unfamiliar with origami techniques. Combine multiple small origami pieces to create scenes or patterns across your card surface. Use patterned origami paper for added visual interest, or fold from solid colors for clean, modern appeal. These dimensional accents transform flat cards into sculptural objects that recipients display prominently rather than tucking away in drawers. The folding process itself becomes a meditative gift you give yourself.

10. Hand Lettered Quote Cards
Beautiful typography transforms simple words into visual art that recipients treasure and often frame for permanent display. Practice brush lettering or modern calligraphy to create stunning birthday messages that double as decorative artwork. Start with simple styles and progress to more elaborate scripts as your hand develops muscle memory and consistency. Include meaningful quotes, song lyrics, or personal messages rendered in your unique lettering style. The imperfections of hand lettering add character and warmth that computer fonts cannot replicate, no matter how carefully chosen. Your recipient knows that human hands created each curve and flourish specifically for them. This personal investment shows clearly in every stroke.
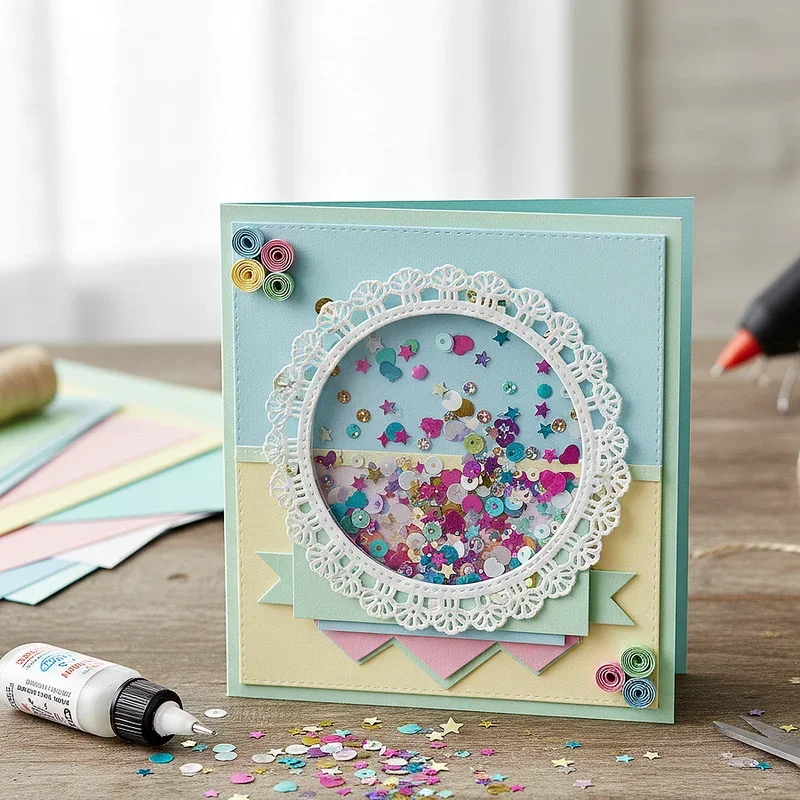
11. Shaker Cards with Confetti
Create celebration in a card by encapsulating loose confetti, sequins, or beads between layers that shake and shimmer with movement. These cards use a window cut in the front layer, covered with clear acetate, with a foam frame creating space for your chosen fillings. When recipients handle the card, the contents dance and shift, creating dynamic visual interest that static cards cannot achieve. Fill your shaker with themed items like birthday candles, tiny stars, metallic shapes, or colored sequins matching the recipient's favorite hues. The satisfying sound and movement of shaker cards creates an experience that begins the moment someone picks it up. These cards feel like holding a tiny celebration in your hands.
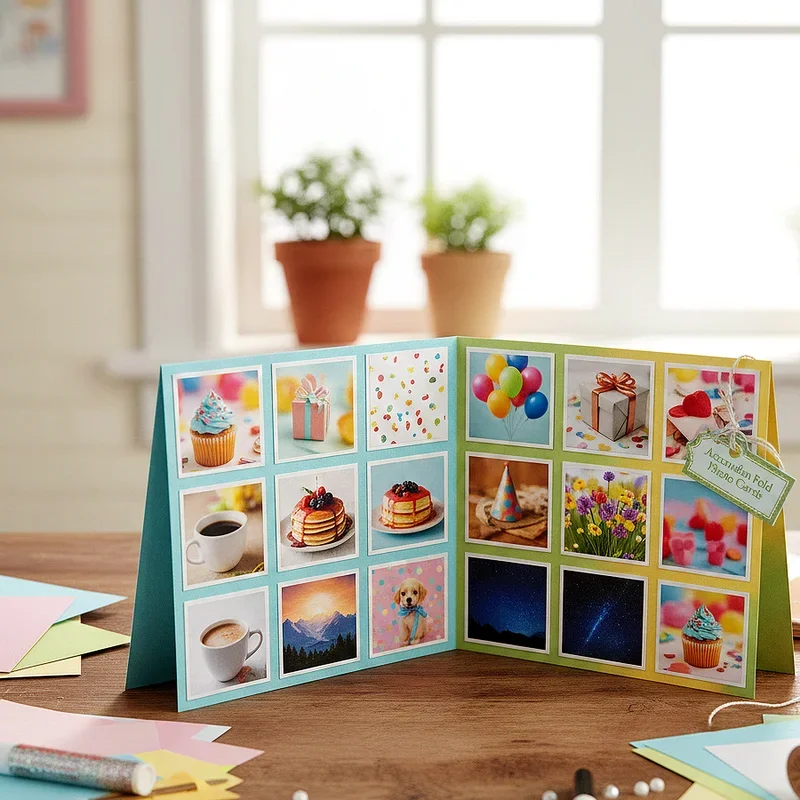
12. Accordion Fold Photo Cards
Expand the storytelling possibilities of your birthday card by using accordion folds that unfurl to reveal multiple panels of content. This format allows you to include numerous photos, messages, or illustrated panels that tell a complete narrative about your relationship. Each fold reveals new content, creating anticipation and discovery as the recipient works through your creation. Document a year of memories, illustrate reasons you appreciate them, or create a timeline of your friendship across the expanding panels. The dramatic reveal when someone pulls the card open creates impact that single-panel designs cannot match. These cards become treasured keepsakes that recipients return to repeatedly throughout the year.
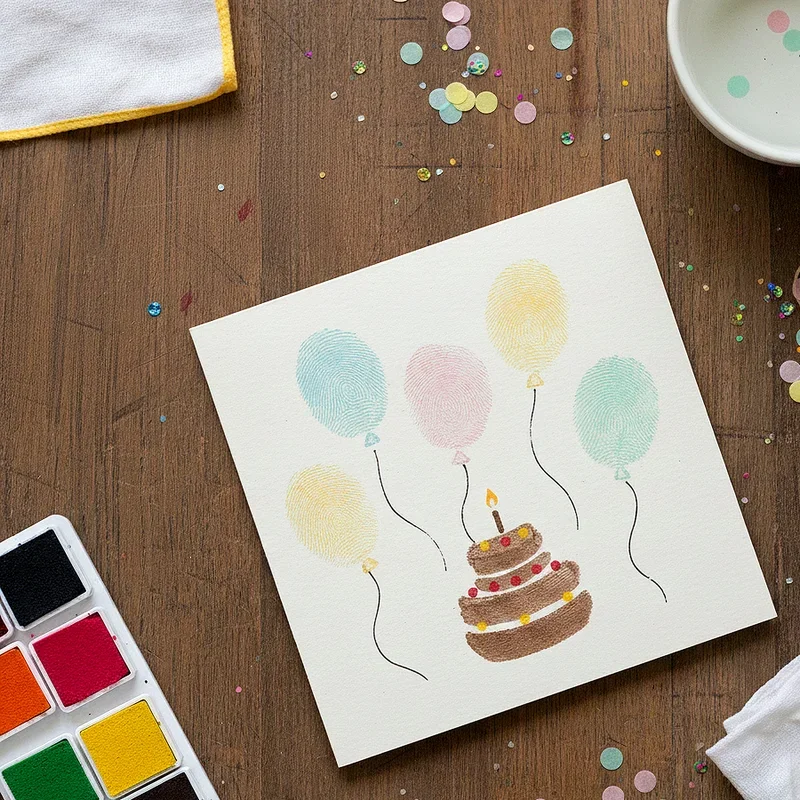
13. Fingerprint Art Cards
Transform your actual fingerprints into charming illustrations that feel deeply personal and completely unique to you. Press your fingertip into ink or paint, then stamp onto cardstock to create the foundation for whimsical characters and designs. Add details with fine tip markers to transform prints into balloons, flowers, animals, or birthday cakes. Create fingerprint trees with thumbprint leaves, or stamp a whole crowd of fingerprint people celebrating the occasion. This technique works wonderfully for cards from children, as even the youngest family members can contribute meaningful elements. The resulting artwork carries the literal touch of the creator, making these cards irreplaceable and deeply sentimental. No two fingerprint cards can ever be identical.
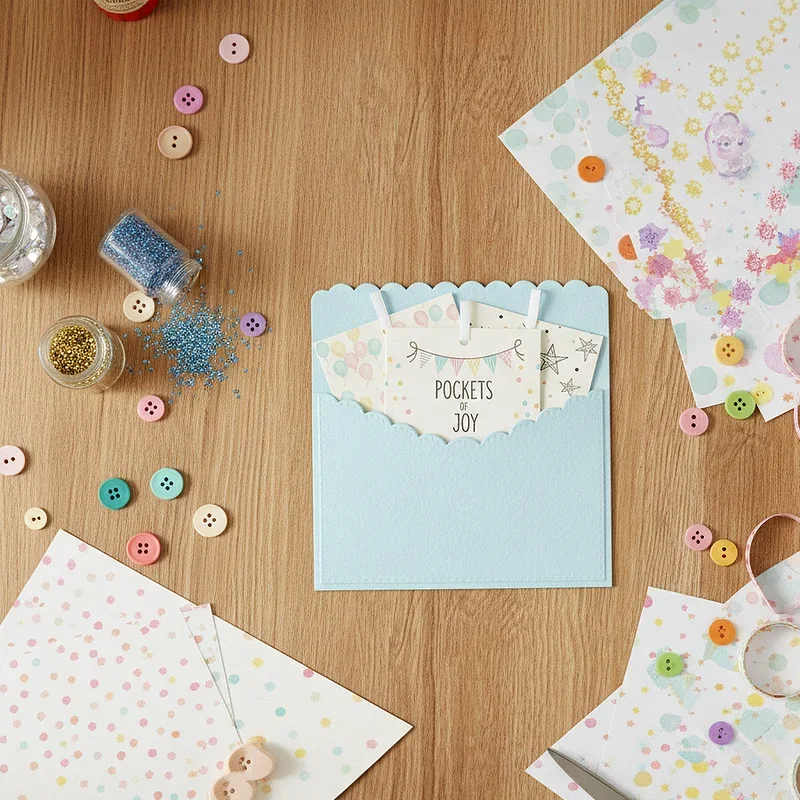
14. Pocket Cards with Hidden Messages
Design cards with secret compartments that hold additional treasures, surprises, or extended messages for the recipient to discover. Create simple pockets using folded paper attached to your card interior, or design more complex hidden mechanisms with pull tabs and sliding elements. Fill pockets with confetti, small notes, gift cards, or meaningful trinkets that complement your birthday wishes. The discovery element adds layers of excitement as recipients explore every fold and corner searching for hidden contents. These cards work particularly well when you have much to say but want to maintain visual simplicity on the exterior. The hidden messages feel like whispered secrets between close friends sharing inside jokes.
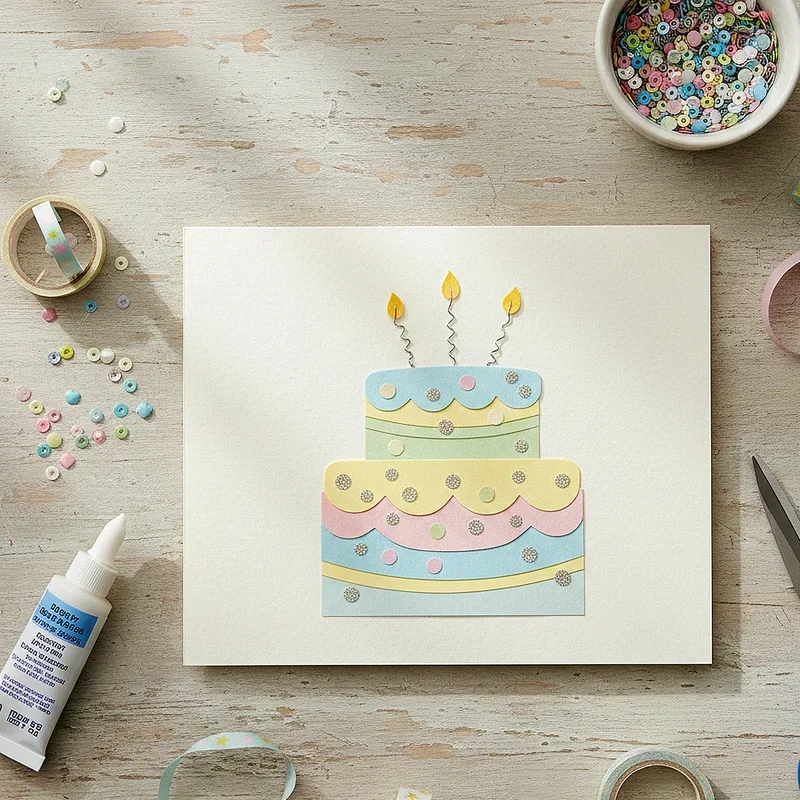
15. Mixed Media Collage Cards
Combine multiple techniques, textures, and materials to create richly layered cards that feel like miniature works of fine art. Layer torn paper, fabric scraps, ribbon, stamps, stickers, and found objects to build complex visual compositions on your cardstock. The juxtaposition of different materials creates tactile and visual interest that single-medium cards cannot achieve. Include personal ephemera like ticket stubs, maps from shared trips, or meaningful printed text from books or magazines. This anything-goes approach liberates crafters who feel constrained by precise techniques requiring specific supplies and skills. The resulting cards reflect the beautiful complexity of real relationships, where many elements combine to create something meaningful and unrepeatable.

Conclusion
Creating handmade birthday cards allows you to give something that money simply cannot buy, which is your time, attention, and creative energy poured into a tangible expression of love. Each technique explored here offers a different pathway to meaningful connection, from the dreamy beauty of watercolors to the playful surprise of pop-up designs. You do not need artistic training or expensive supplies to create cards that touch hearts and become treasured keepsakes. Start with whichever idea calls to you most strongly, and let your creativity flow without judgment or perfectionism. The imperfections in handmade items tell the story of human hands working with love and intention.
Read next: 15 Birthday Table Decorations Ideas to Impress Guests
Frequently Asked Questions
Q1. What basic supplies do I need to start making DIY birthday cards?
A: You need cardstock, scissors, glue, markers, and any decorative elements you prefer.
Q2. How far in advance should I start making a handmade birthday card?
A: Begin at least one week early to allow time for mistakes and drying.
Q3. Can I make impressive cards without any artistic skills whatsoever?
A: Absolutely, techniques like washi tape and button art require zero drawing ability.
Q4. What is the best cardstock weight for handmade birthday cards?
A: Choose cardstock between 65 and 110 pound weight for sturdy professional results.
Q5. How do I prevent my watercolor cards from warping and buckling?
A: Use heavier watercolor paper and tape edges down while the paint dries completely.
Stay up to date with our latest ideas!